Create Your Own Agent Using smolagents
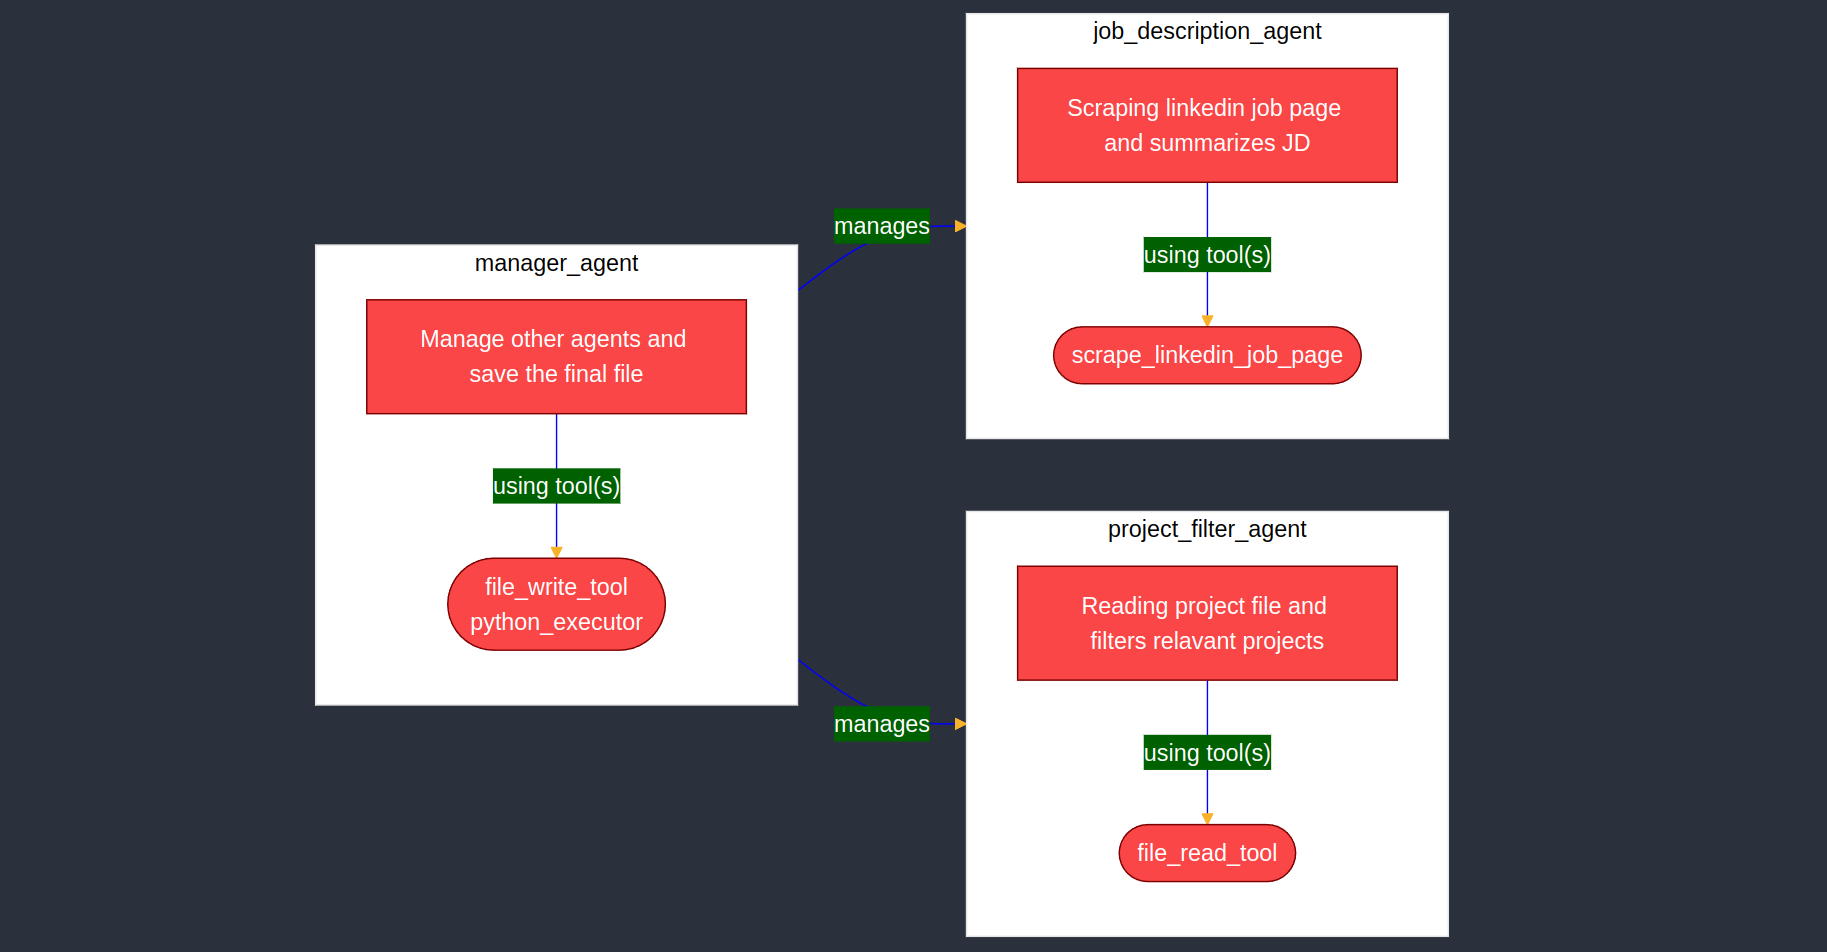
Table of Contents
Introduction
Important Note
This is the second article of a series of articles on Agentic AI. In the first article, we discussed what agents are, how they work, the benefits of using agents, and some applications of agentic AI. We also discussed the workflow of a typical agent and how to create a simple agent. Most of the concepts introduced there will be used here. If you have not read the first article, I recommend you to read it before continuing with this article. You can find the first article here.
Large language models are very good at natural language processing, reasoning, and generating code. However, they are just a system that takes text (and sometimes images, video, and audio) as input and generates text (and other formats) as output. They lack the ability to interact with the environment, fetch information from the web, or access external databases. Agents are a way to provide LLMs with the ability to interact with the environment. An agent is a system that uses an LLM to decide the control flow of an application. This means that an agent can use an LLM to generate code, call functions, and make decisions based on the information it has. This is in contrast to a system that uses an LLM to generate text or code but does not use the LLM to decide the control flow of the application.
The purpose of this article is to walk you through a step-by-step guide to creating an agent using smolagents. The complete code for the agent is in this notebook.
A Brief Note On smolagents
smolagents is a minimal library that has tools to create agents. The reason why we will be using this library instead of other more sophisticated libraries (like LangGraph, crewAI and pydantic-ai) is because it is minimal and easy to use. The codebase is very simple and easy to understand so, one can always consult the source code itself to understand how the library works.
smolagents provides two types of agents: ToolCallingAgent which is just an LLM that can call a tool provided to it and CodeAgent which can write and execute Python code at each step. An LLM running Python code locally is not a good idea. However, smolagents has implemented a local Python executor that can run the code in a safe environment with limited access to imports and functions.
The library also provides a number of useful tools that can be used to create agents. If the tool you need is not provided, you can always create your own tool which is as easy as creating a Python function.
Installation
smolagents can be installed using pip:
pip install smolagents
Once installed, you can start building your own agents. Here is an example1 agent that calculates 118th Fibonacci number. Note that you must pass your Hugging Face API token to the HfApiModel class.
from smolagents import CodeAgent, HfApiModel

model_id = "meta-llama/Llama-3.3-70B-Instruct"

model = HfApiModel(model_id=model_id, token="<YOUR_HUGGINGFACEHUB_API_TOKEN>")
agent = CodeAgent(tools=[], model=model, add_base_tools=True)

agent.run(
    "Could you give me the 118th number in the Fibonacci sequence?",
)
Refer to the official documentation for more information.
Problem Statement
When creating a resume, it is advisable to tailor the resume to the job description by adding relevant skills, projects, and experiences. One of the most time-consuming tasks is to go through the job description, extract important points, and filter out which projects to include in the resume. Instead of doing this manually, we can create an agent that can scrape a LinkedIn job description, save the important points to a file, and help you figure out which projects to include in the resume. In short, our agent will take the LinkedIn URL of the job description and the file that has all your projects and will create a file that has the important points from the job description and the projects that are relevant to the job description.
Breaking the problem in a step-by-step manner, we need to do the following tasks:
- Scrape the job description from Linkedin.
- Extract important points like skills, experience, etc.
- Save the points to a file.
- Read the file that has all your projects.
- Filter out the projects that are relevant to the job description.
- Write the filtered projects into a file. For now, we will write the filtered projects to the same file that has the important points from the JD.
A Note About The Task
I have selected this task specifically because it is a good example of how agents can be used to solve a non-trivial problem. This task is complex enough that we can use many techniques, like building our own tools and using a multi-agent system.
Agent Design
One way to go about this is to create a single agent that does the six steps. Provided that our task is not that challenging, this is indeed the best way to go about it. (We should always avoid complexity if we can.2) However, we will be creating more than one agent mostly because:
- This way we can learn how to create manager-managed agents.
- Having multiple agents makes it easy to extend our use case. If we want to add more functionality, like updating the project descriptions to better suit the JD, we can easily do so with minimal change.
- This way, one agent is only responsible for a subset of the tasks and need not worry about the other tasks. This also makes the system more modular and scalable and less prone to errors.
If we look at the tasks, we can divide them into two categories: scraping and summarizing the job description and filtering the projects. We will create two agents, one for each task. Let us call the first agent job_description_agent and the second agent project_filter_agent. Since we have more than one agent, we need a way to coordinate between the agents. One way to do so is by creating a manager agent, which will be responsible for using the other agents and coordinating between them. This is an example of a multi-agent system3. If you have read the previous article, you will remember that this is the highest form of agency.

We will create a manager agent that will use the job_description_agent and the project_filter_agent for the tasks.
Tools
Our agent is going to need some tools to help with the tasks. Here is a list of tools that are required:
- Linkedin Scraper: To scrape the job description from Linkedin.
smolagentsprovides a tool to scrape a website, however, it is not very sophisticated and returns a lot of useless information. We will create our own tool to scrape the job description so that we return only the important part of the webpage. - File Reader: To read the file that has all your projects.
smolagentsdoes not provide a tool to read a file, though, we can use the Python interpreter with theopenfunction to read the file. While working with agentic AI, it is always better to rely less on LLM-generated code and more on the tools created by you. In this spirit, we will create our own tool to read the file. - File Writer: To write the important points from the job description and the filtered projects to a file. Again, we will create our own tool to write the file.
Let us start by creating the tools.
Creating the Tools
smolagents provides two ways to create a tool: using a function or using a class. We will go through both the ways of creating a tool. We will create the LinkedIn scraper tool using a function. Here is the code to create the tool:
from smolagents import tool


@tool
def scrape_linkedin_job_page(job_url: str) -> str:
    """
    Scrapes a LinkedIn job page and returns a text in markdown format containing the job title and job description.

    Args:
        job_url: The LinkedIn job page URL.

    Returns:
        str: The job title and job description in markdown format.
    """
    headers = {
        "User-Agent": "Mozilla/5.0 (X11; Linux x86_64) AppleWebKit/537.36 (KHTML, like Gecko) Chrome/131.0.0.0 Safari/537.36",
    }

    res = requests.get(job_url, headers=headers)
    res.raise_for_status()

    soup = bs4.BeautifulSoup(res.text, "html.parser")

    title = soup.select_one("title").text.split("|")[0].strip()

    jd = soup.select_one("div.show-more-less-html__markup")
    jd = md(jd.prettify())

    final = f"# {title}\n\n## Job Description\n{jd}"

    return final
The tool decorator from smolagents is responsible for converting a function to a Tool object that can be used by the agent. Take a special note on the type hint and the docstring. Both of these must be provided because smolagents uses these to create a description of the tool. While calling the LLM, this description is passed along with the prompt so that the LLM can have information regarding which tools are available to it. You need to make sure that the description is verbose and covers everything that the function is able to do. The docstring must use the Google-style docstring format.4
We are using requests and beautifulsoup4 to scrape the job description. The job title is extracted from the title tag and the job description is extracted from the div tag with the class show-more-less-html__markup. The job title and job description are then combined and returned as a markdown string.
Next, we will use the tool for reading and writing files. Here, the tools are created using a class.
from smolagents import Tool


class FileReadTool(Tool):
    name = "file_read_tool"
    description = "Use this tool to read a simple text file."
    inputs = {
        "file_path": {"type": "string", "description": "The path to the file to read."}
    }
    output_type = "string"

    def __init__(self, *args, **kwargs):
        super().__init__(*args, **kwargs)

    def forward(self, file_path: str) -> str:
        directory = os.path.dirname(file_path)

        if directory and not os.path.exists(directory):
            raise ValueError(f"Directory {directory} does not exist.")

        if not os.path.exists(file_path):
            raise FileNotFoundError(f"File {file_path} does not exist.")

        with open(file_path, "r") as f:
            return f.read()
We have created a class that inherits from Tool and has a forward method that reads the file and returns the content. The forward method is called when the tool is used by the agent. The class has name, description, inputs, and output_type attributes that are used to create a description of the tool. The inputs attribute is a dictionary where the key is the name of the input and the value is a dictionary with the type and description of the input. The output_type attribute is the type of the output of the tool. Since the information about the tool is provided in the class itself, we do not need to provide a docstring (or type hint).
Let us create the tool for writing the file.
class FileWriteTool(Tool):
    name = "file_write_tool"
    description = "Use this tool to write a string to a file. Write the provided data to the file at the provided path. Returns the path to the file."
    inputs = {
        "data": {"type": "string", "description": "The data to write to the file."},
        "file_name": {
            "type": "string",
            "description": "The path to the file to write. Must have a .txt or .md extension.",
        },
        "directory": {
            "type": "string",
            "description": "The directory to write the file to. If not provided, will write to the current directory.",
            "nullable": "true",
        },
        "overwrite": {
            "type": "boolean",
            "description": "Whether to overwrite the file if it already exists. Default is False.",
            "nullable": "true",
        },
    }
    output_type = "string"

    def __init__(self, *args, **kwargs):
        super().__init__(*args, **kwargs)

    def forward(
        self, data: str, file_name: str, directory: str = None, overwrite: bool = True
    ) -> str:
        if not file_name.endswith(".txt") and not file_name.endswith(".md"):
            raise ValueError("File name must end with .txt or .md.")

        if directory is not None:
            if not os.path.exists(directory):
                raise ValueError(f"Directory {directory} does not exist.")
            file_path = os.path.join(directory, file_name)
        else:
            file_path = file_name

        if os.path.exists(file_path) and not overwrite:
            raise FileExistsError(
                f"File {file_path} already exists. Set overwrite to True to overwrite it."
            )

        with open(file_path, "w") as f:
            f.write(data)

        return f"File written to {file_path}."
The FileWriteTool class is similar to the FileReadTool class. The forward method writes the data to the file and returns the path to the file. The inputs attribute has an additional key overwrite which is a boolean that tells the tool whether to overwrite the file if it already exists. Whenever your tool has some optional inputs, you must set the nullable key to true for the corresponding input. This lets the agent know that the input is optional.
While creating tools, you should use error handling to catch any errors that might occur. If an error is captured, you should raise an exception with a meaningful message. This will help the agent to understand what went wrong and take appropriate action.
Creating the Agents
Now that tools are created, we need to create the agents. Before creating an agent, we need to decide two things: the tools that the agent will use and the LLM. For tools, we should not give our agent any more tools than it needs. This prevents the agent from using the wrong tool. So, here are the tools that the different agents will use and why:
| Agent Name | Tool(s) Used | Reason |
|---|---|---|
job_description_agent | scrape_linkedin_job_page | This agent will only scrape the job description from Linkedin. |
project_filter_agent | file_read_tool | This agent will read the file that has all your projects. |
manager_agent | file_write_tool, python_executor | This agent will write the important points from the job description and the filtered projects to a file. |
For the job_description_agent and project_filter_agent, we will use the ToolCallingAgent class. For the manager_agent, we will use the CodeAgent class. This will give our manager_agent access to executing Python code which makes it a better agent.5
Now, as for the LLM, you can choose any sufficiently advanced model. Our task is not very complex and a free and open source model like Qwen/Qwen2.5-Coder-32B-Instruct should be sufficient. This is what we will be using. The model can be loaded using the HfApiModel class from smolagents.
from smolagents import HfApiModel

import os
from dotenv import load_dotenv

load_dotenv()
HUGGINGFACE_API_KEY = os.getenv("HUGGINGFACE_API_KEY")

model_id = "Qwen/Qwen2.5-Coder-32B-Instruct"
model = HfApiModel(model_id=model_id, token=HUGGINGFACE_API_KEY)
You need not use the same model for each agent. You can use models that are smaller and cheaper for agents that are to perform simple tasks and use complex models only for those agents that require it. In our case, both the managed agents are performing simple enough tasks that Qwen/Qwen2.5-Coder-32B-Instruct should be sufficient. You can, if you want, use an advanced model such as deepseek-ai/DeepSeek-R1-Distill-Qwen-32Bfor themanager_agent.
Now that all these details are sorted out, let us create the agents. You can create agents using the ToolCallingAgent or CodeAgent class. Both these classes take the tools parameter which is a list of tools that the agent will use. Here is the code to create the agents:
from smolagents import ToolCallingAgent, CodeAgent, ManagedAgent

job_description_agent = ToolCallingAgent(
    tools=[scrape_linkedin_job_page],
    model=model,
    add_base_tools=False,
)

job_description_agent = ManagedAgent(
    job_description_agent,
    name="job_description_agent",
    description="Have a knack for finding the relevant information from a job description. Can scrape the job description from a LinkedIn job posting and summarize its contents.",
)

project_filter_agent = ToolCallingAgent(
    tools=[FileReadTool()],
    add_base_tools=False,
    model=model,
)

project_filter_agent = ManagedAgent(
    project_filter_agent,
    name="project_filter_agent",
    description="Good at creating CVs that are tailored to the job description and are ATS friendly by selecting the most relevant projects with the right keywords from your portfolio.",
)

manager_agent = CodeAgent(
    tools=[FileWriteTool()],
    managed_agents=[job_description_agent, project_filter_agent],
    add_base_tools=False,
    model=model,
)
We first created the job_description_agent and project_filter_agent using the ToolCallingAgent class. We have then wrapped the agents in the ManagedAgent class. The ManagedAgent class is used to create a managed agent that can be used by the manager_agent that is created in the last and takes the job_description_agent and project_filter_agent as managed agents. Also, note the manager_agent is created using the CodeAgent class instead of the ToolCallingAgent class to provide it with the ability to execute Python code. Since each agent takes the model parameter, you can use different models for different agents.
Even though the job_description_agent and project_filter_agent are agents, since they are managed by the manager_agent, they work equivalent to tools. The manager_agent can call the job_description_agent and project_filter_agent with a request, the same as it would call a tool. For your manager_agent to understand what the managed agents can do, you need to provide a description of the managed agents. I have written a short description for each managed agent. Feel free to update the description to better suit your needs.

The final agent design with the job_description_agent, project_filter_agent managed by the manager_agent.
Running the Agents
This is it! Now, we use to call the manager_agent with a prompt. The prompt must mention the task that you want the manager_agent to perform in a clear and detailed manner. You must also pass the job_url and the all_projects_path to the prompt. The manager_agent will decide which agent/tool to call and what information to pass to them. Here is my prompt and the code to run the agent:
from textwrap import dedent


start_prompt = dedent(
    """
    You are an experienced data scientist looking for a new job. You come across a job posting on LinkedIn that you are interested in. You need to save the job title and a brief summary of the job description, mostly about 5-10 bullet points, to a markdown file for later reference. The file must have a format: `<position_name>_<company_name>.md`. If position_name or company_name is not found, use the format `<job_id>.md`. Here, job_id is the last part of the job posting url. The job posting is at the following URL:
    {job_url}

    Once the summary is stored, you need to select which projects from your portfolio to include in your job application. You have a markdown file that lists all your projects and their descriptions. You want to select at most five projects that are most relevant to the job posting and save the selected projects to the same markdown file where you saved the job description. You need to just mention the name of the projects that you want to include in the application. No need to write the project descriptions.

    The markdown file with all your projects is located at `{all_projects_path}`. You MUST NOT modify this file.
    """
)

manager_agent.run(
    start_prompt.format(job_url=job_url, all_projects_path=all_projects_path)
)
If everything works fine, you should see logs of the manager_agent calling the job_description_agent first, to scrape the job description, and then the project_filter_agent to filter the projects. The manager_agent will then write the points from the job description and the filtered projects to a file.
This is a very simple task. Now that you have an understanding of the workflow of creating an agent, you can create more complex agents that can perform more complex tasks. A simple example would be to make your agent not only filter out which projects to include in the resume but also update the project descriptions to better suit the job description. You can go one step further and create an agent that can update your resume with the filtered projects and compile them into a PDF file. The possibilities are endless.
Conclusion
In this article, we learned how to create an agent using smolagents. We created a manager agent that used two managed agents to scrape a job description from LinkedIn and filter out the projects that are relevant to the job description. We also learned how to create tools using functions and classes and created multiple tools using both methods. The final agent design was a multi-agent system that used a manager agent to coordinate between the managed agents. Find the complete code in this notebook.